Saturday, December 4, 2010

All your Base(boards) are belong to us

Sort of an old Meme, but a classic.

Anyway, we have been living without baseboard in the living room since before we moved in. The living room was originally carpeted, as you may recall, and when we removed the carpets to work on the hardwood, we took out the baseboards too, since they were about an inch off the new floor level. That is how things stayed for a year and a half, until after some reading and we were on our way!

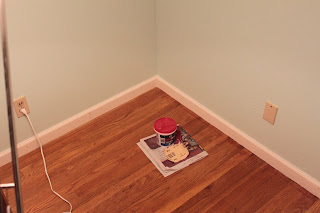
Here is what it looked like for over a year and a half:
Pretty ugly, right? Notice the huge gap at the bottom of the wall.

Filling is an important part of trim work, at least when you cut wood like I do, and when your house is as warped as this one.

Here is pretty much what the finished product looks like, all clean and white and done!
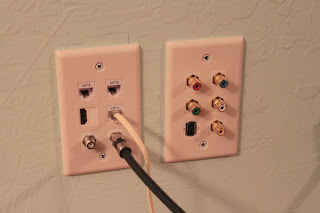
As part of this project, I had to finish wiring our AV plugs behind the TV (shown three cat6, HDMI, two coax, five RCA, and one FireWire)

This project was also the first that young Master House assisted on. Here you see him moving a piece of baseboard used for measuring purposes.

The baseboard we are using is a solid pine, pre-primed from Home Depot. I think that they pre-prime it mostly to hide the crappiness of the wood. You can see the profile in the picture above. We painted it a nice gloss white, which should be easy to clean in the future. The board is sold in nice long lengths (18 feet), but that also makes it exciting to bring home:Anyway, this project is creeping along (we started in August!), held up various other projects and for a while by the lack of a safety key for the table saw. We have the living room and one side of the hallway done. Still have the entry and the kitchen to do, as well as the other side of the hallway.
Still, the living room is done! That counts for something right?

Wednesday, November 17, 2010

November

The month is half over already, and we have been busy! First, yes, this is a tomato flower, and in November! With the string of nearly 80 degree weather we have had, we may even get some more tomatoes.On Saturday I ripped out most of the garden, and planted some winter vegetables. We planted garlic, lettuce mix, beets, and snow peas, which were all the "winter" things we had. Still going strong are the tomatoes, sweet potato, and chives. We will see how they end up.
Other than garden work, and chasing around the offspring, we have been working on baseboards, and the tv/book storage solution. Expect more posts on those in the future! Anyone need a couple of old bookcases?

Friday, September 17, 2010

Feeling a little Shelfish

With the impending arrival of the addition to our family, we found it necessary to wind up our hobby room to create space for a nursery. As one of us (me) has an extraordinary amount of hobby material, this meant that we need to find some storage somewhere, something that could safely hold all the various materials and models. (mostly unbuilt models of course!)

Since I have an inordinate love of storing things in office boxes, we decided that a set of shelves designed to hold 15+ of these boxes would be ideal. Also, since we do few things by halves here at This Old Blog (should we finish a project at all of course), the shelves were built to be adjustable, hold far more weight than they would, and tied into the rafters and studs for extra support. We also planned to create a seat for changing shoes, and a space to store two large plastic tubs.

As always major construction was accomplished with the aid of my father, and minor work completed by me in the wee hours.

The shelves were built in a corner of the garage by the side door and the door to the house. This space was occupied at the time by a bizarre accumulation of closets built on closets, storing nothing but spiders a the time. Previously it appeared to be a broom, paint, and dust storage closet. This was ripped out, which was difficult, because like everything built by the previous owner in this house, it had about two nails per linear foot of board, sometimes more. All nails were three inches long or more, although the size varied from nail to nail. We ended up ripping the boards out, and removing the nails later when possible.

While we were doing all this, we also replaced the cardboard cladding of the garage corner in question, and drywalled, textured, and painted. Yes, I said cardboard. Some previous owner covered up the studs in the garage with fruit box cardboard. Some of that was subsequently covered with shelving material or drywall. A horrible mess. Removing all of that also exposed some minimal termite damage, which was photographed and scraped away.

After the drywall was installed, the surface textured, the supports tied into the frame of the garage, and the seat constructed, the shelf brackets were installed. Then shelves were cut to fit, supports added to the front edge of each to prevent bowing, the whole mess sanded and painted to match the garage walls.

Now, on with the pictures:

The previous closets on closets

What lies beneath


Drywall up

Putting shelves together
Pre painting and sanding with boxes to test placement

Final paint
Next time on this old blog: Fencing? Wiring? Nursery? Garden or trees? You will have to tune in to find out.

Sunday, September 12, 2010

Before & After

I realized that I never did a follow up from this post. A few months ago I finally bought a mantel from craigslist. I had been looking for close to 6 months and finally found one that would have a pretty good fit, be easy to mount and not too expensive. Those were the three main things that were holding me up. Our box and surround are a weird size so hardly any of the mantels I found would work. The mantels that would work were mainly all super heavy concrete which we had no clue how to move let alone mount. Anyway my dad and I drove my round prego self to the middle of nowhere to pick it up. We tried haggling on the price a little but the guy wouldn't budge, I got it for $200, which is not a bad deal considering it is carved wood.

Before:


After:


Now the issue is that the surround is not as big as the mantel so you can see some brick. For now I may just paint the brick that it is still exposed black, but we want something more attractive. What I would like to do is have a hammered copper surround but I am not sure where to start on that search. There is also tile or just getting a bigger piece like the one that's there. Any advice from the peanut gallery?

Thursday, August 26, 2010

Art Wall

So I have a brand new mindset lately. Or should I say motto? Motto, yes let's go with that. My new motto is "just do it". Not necessarily in the Nike way, (what exactly did they mean by that?) My way of thinking about it is with things around the house. Instead of always walking past that patch of dirty floor thinking "oh, I really should get around to sweeping that" then the next day walking past thinking "still need to sweep" and then the next day "this floor is disgusting, this place is a pigsty" then "you are so lazy, just sweep the floor!" So instead of torturing myself like that I decided to "just do it" - if I see something that I want to fix, just do it right away. It might make me alittle more scatter brained because I am always doing 20 things at once, but at least I'm not beating myself up, and hey, things are actually getting done.

Take our art wall for example. I finally got around to framing a few more pieces of art and finally hanging some on the walls. Its like Mr House said "Gee, after over a year it finally looks like we live here." Here is the finished (for now) art wall.

Friday, July 23, 2010

Decorating project

I have been anxious to finally get some art hung up on these bare walls. It is kind of sad how little decorating we have done considering the fact that we have lived here for over a year. Ok, yes our attention was focused on other, more important things. But a house without decor is like a cake without icing! And who wants to eat a dry icing-less cake? Not me!

So we have had in mind to do an art wall on one side of our living room for some time. Finally I wanted to get started. I really wanted to hang up my poster from Hitchcock's Vertigo on the wall because A. I love it and B. I thought the orange would pop so well against the icy blue of our walls. The problem was that I decided the poster was just too big to be included on the art wall. Also maybe I had this nagging thought of "Hey now Abby, you are a real adult. REAL adults don't hang movie posters on the walls unless it is in their home theater. Do you have a home theater? No??"

But I digress. I decided to chop my beloved poster down to a smaller size and frame just a chunk of it. This way I could make it more artsy and less postery and it would be a more digestible size for my wall. Here is what the original poster looked like - don't worry, it wasn't original or anything close to good quality. It had rips and tape pieces from when we had it hung over our very steep staircase in our old apartment and I had to jump up and rip it off the wall when we moved.


I found this interesting frame at Aaron Bros (one penny sale score!) and just moved the matte around until I liked it. I decided that I liked the font too much to cut the text out completely, but I didn't really want it to include whole words. Also I wasn't crazy about the idea of my wall saying "Hitchcock's piece".


Finally I stuck it in the frame, and voila! New art!


Now to finish framing some other things and hopefully our cake will soon be iced!

Tuesday, July 13, 2010

First Harvest

We have been busy as ever at This Old Blog. Just wanted to update you on our first garden harvest. These cherry tomatoes are so delicious! I think it is especially true with tomatoes that nothing really beats the taste when they are home grown. They make store bought tomatoes taste like white bread.

Sunday, April 18, 2010

Growing new things!

Today we put in our 2010 veggie garden. As usual we started by sprouting some seeds a few weeks back. To these plants we picked up a few additions from our neighborhood nursery Green Acres. Everyone and their mom were at the nursery today, I swear! Here is a shot of the contenders!


As you can see we have quite a boat load. Hopefully at least some of them will make it! Among the plants are cantaloupe, cucumber, honeydew melon, zucchini, spaghetti squash, cilantro, basil, bell pepper, cubanelle pepper, leeks, chives, corn, beans, acorn squash, two different kinds of tomatillos and four different kinds of tomato! Wow!

The garden area started out a dreadful mess, but Mr. House has been very busy working the ground and getting it ready for planting. This is what it looked like before we really dug in.


Mr. House expertly crafted nice rows and we laid out the plants to figure out where their new homes should be.


After more hard work we got them all in the ground and ready to provide us with a summer bounty!


As you can see from this final shot, fruits and veggies aren't the only things we are growing!! ;)


Friday, March 12, 2010

Happy Anniversary!!

Well it has been a whole year since we signed the papers on our house!!! In that year we have learned many things and made many improvements but somehow there are those things that never get done. We have had this todo list on our fridge since we first moved in. . . with many things still not crossed off! Instead of talking about all the things we have accomplished, I thought I would share all those things we haven't gotten around to because that is just the kind of mood I am in.

1. Fix entry door sill
Basically there is nothing under our front door. Quite ugly

2. Install switch plates
OK so this one is like 95% done . . . but for some reason there are a few bare light switches and power outlets around this place. Really bugs me.

3. Label circuit breaker
The few labels that are actually preexisting on the breaker are mostly incorrect. So basically we have little to no idea what is controlled by what. Makes doing electric work loads of fun.

4. Install laundry storage
We had dreams of a beautiful countertop and some upper cabinets and shelving. I really want to rig it so we can have that thing where your detergent sits above your washer and you can just like push the little thing and have it pour directly down into your washing machine. Would really love that.

5. Install window coverings in garage.
"Look everyone walking by! Here is all our junk!"

6. Paint all trim and doors
Yeah, this really need to get done.

7. Install master bath floor
Putting something nice and like . . . waterproof over the old wood floors we have in there would be just wonderful.

8. Re-install baseboards
This is absolutely #1 on my would really like to get done list. I can't even express how much it bugs me to see this ugliness. As an added bonus, when sweeping the floors you can just sweep all the dirt under the walls! Works wonders!

To start the second year in the house I think I will start a NEW list and see how that one goes.

Monday, February 8, 2010

New additions

We bought some new fruit trees last week and got them in the ground.

Meet Mr. Bosc Pear


Hello Mr. Pear, pleased to meet you.
. . .

And here is Ms. Nubiana Plum


Why, it's pleasure to make your acquaintance Ms. Plum.

Friday, January 22, 2010

Homemade pasta

For Christmas we at TOB received a wonderful kitchenaid attachment in the form of a pasta maker. Eager to get with the fresh pasta making (and therefor eating) we decided to give it a try. For our first attempt we made fettuccine with a carbonara sauce. The results were delicious! There really is nothing like the taste and texture of home made pasta!


Here is the finished product in all its glory!